I have the case of the mundane rugs at my house. Seriously. I never really noticed it until I started looking for a rug to replace my old brown one in my entry way, but all the rugs (besides two area rugs) are completely boring. They are either brown, cream, or white. Nothing to them. Why did I not think of getting a pattern one when I bought them? I have no idea.
Since I started updating my entry (you can see in this post) I've been on a search for a great rug. I found one, but it was too much money for what I wanted.
But really, the horrible brown rug that was welcoming my guests just had to go. So, instead of spending a ton of money, I went for the no money option:) You remember that stencil I used on my old entry way table back in the day? Well, I found it and pulled it out.You can download the template for it here or at the bottom of the post.
It's a really easy stencil to follow. My hand hurt a little bit after awhile from squeezing the dang fabric paint, but it was well worth it. I've used just normal craft paint on some of my stenciling on fabric before, and it actually holds up quite nice. One of my favorite dish towels was stenciled with just normal paint, and it has lasted far beyond 30 or so washes. But I wasn't sure how normal paint would last on such a high impact area and on thicker fabric, so I opted to use some fabric paint. Just follow the stencil with the tip of it, try not to get it on the stencil, or else, when you move it, you'll have residual paint everywhere....trust me....learn from my mistake :)
Then let it dry for 24 hours. Heat set it with an iron over a piece of clothe. And there you go!
You can fill in the lines with some paint, but I just loved this look, so kept it like this.
A little bit better than just a plain ol' brown rug, dontcha think?
Okay. So, I wanted to do all my rugs....but alas... I only got around to doing two. lol. This next rug I wanted to do a chevron pattern.
So first step, which I failed to mention before...make sure you wash your rugs! lol. kinda important. Oh, and I got each of these brown rugs for like $5 at Ross. Not bad considering they are about $20 anywhere else. Plus they are super plush and double sided.
Okay. So as for this second rug...
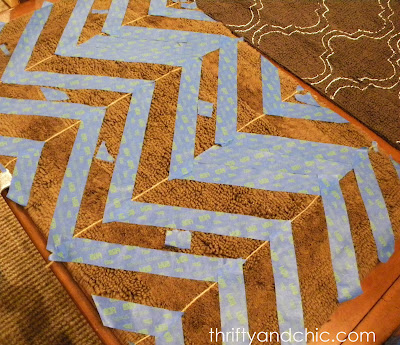
I never did a chevron pattern by hand before so I flew by the seat of my pants on this one....and somehow...it worked. So, first up was to get the lines. I measured every 7 inches and taped a piece of jute along the rug at each 7 inch mark. Make sure you measure from the top and bottom to get a good straight line.
Next was to get where I want the peaks and the valleys of the lines to be. So, I measured 7 inches on each piece of jute and marked it.
I started from the middle section. With the first piece of tape I had the corner hit on the 7 inch mark on the piece of jute to the left, and then taped it up diagonally to hit the next 7 inch mark on the right jute. This was pretty much just a starting off point because once I realized that the amount of pattern I was creating for every 7 inches left a lot more white than brown, and I wanted the opposite.
So, I ran two extra pieces of tape along the first piece. Then for the next section below it. I found one of the 7 inch marks and started doing the same thing as before. Now that was pretty much the last time I used the marks. From there, I just made sure that the gaps and peaks and valleys measured the same on every piece.
To save tape...and because of laziness :) I just marked where not to paint in between some of the pieces of tape, thats why you see a really weird pattern going on.
You may run into my problem where the next 7 inches at the end ended up only being 6 inches, so to make sure the angles were correct, I just put my tape measure an inch from the edge and used it as a 'make believe' piece of jute. lol. Worked like a charm.
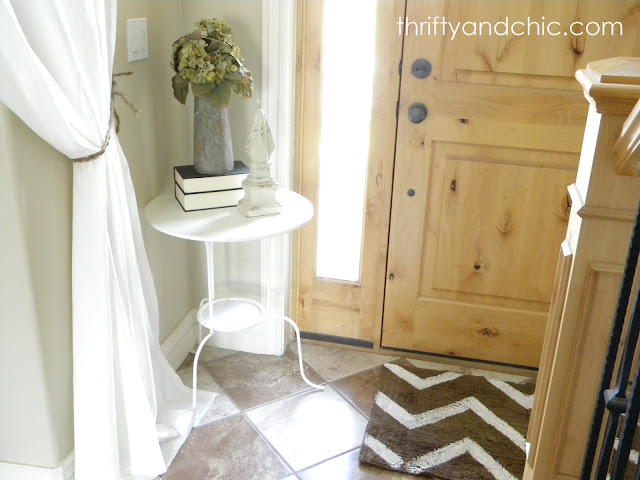
Next is to paint! I just painted where I wanted the lines. I could have painted a ton more lines, but I didn't want the pattern to be too busy. But you can paint in between the three pieces of tape and get more lines.
I think its a little Charlie Brown reminiscent for some reason. lol. But I like it :) This one will probably find its place back at the backdoor. Or does it look better than the other one and I should keep it at the front?? Decisions, decisions. Oh, and you can see that I ended up keeping the table up here. I've gone in and out of this door enough times and haven't hit it or tripped over it once :)
Subscribe to:
Post Comments (Atom)


Great idea! I have the same rug in white in my bathroom, and you're right, they are so plush!
ReplyDeleteGreat job, I would never have thought of that. It turned out beautifully!
ReplyDeleteLove it!!! You are so awesome my dear!
ReplyDeleteLove your guts
mandi
I'm addicted. I think your blog might be the coolest I've come across. You are super crafty and I yearn to be that way. I'm starting with baby steps but I think your site just might be what I need to keep me inspired. Thank you, thank you, thank you. You have a new follower! Check out my blog. I'm a newbie but I hope to have some great stuff coming up!
ReplyDeletehttp://acountry-galsdomesticjourney.blogspot.com/
I love this. I just painted stripes on a sisal rug I have, such a fun upgrade. Yours are awesome!!
ReplyDeleteCan I ask a blog question? Is your project gallery page a plug in? I am in love with it!! It is by far the prettiest, more conveniently organized page I've seen. Thanks!!