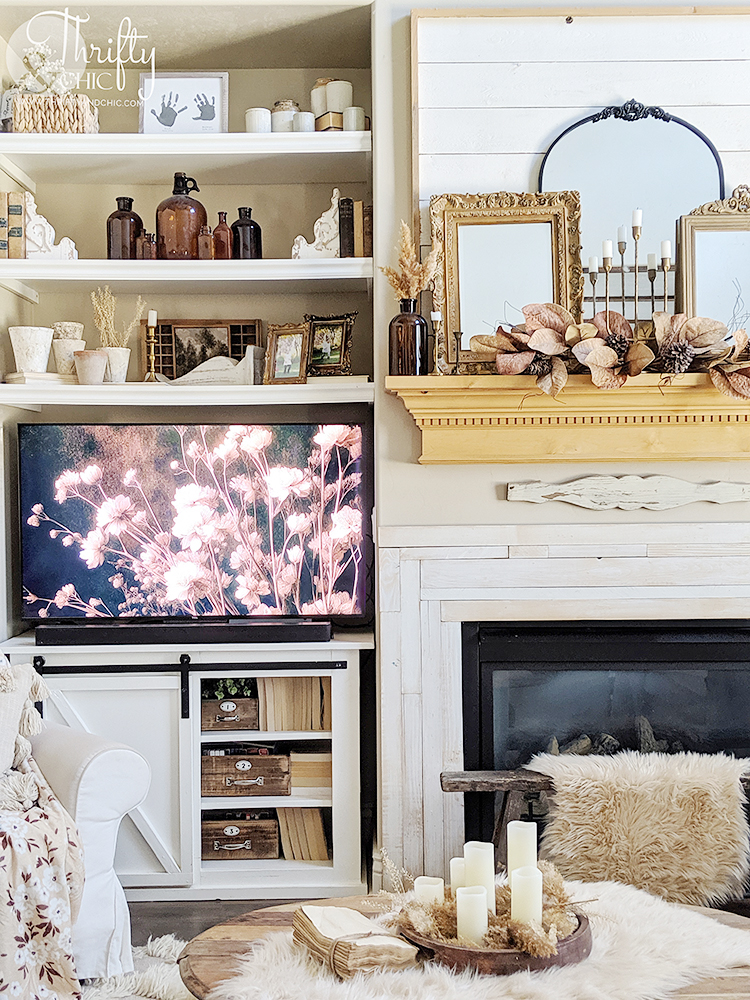
Thursday, May 16, 2013

$13 Framed Builder Mirror Tutorial

Pin It
 Happy Thursday! Since I'm in the process of giving a little makeover to my master bathroom, I knew the first thing that had to change was the mirror. I've been wanting to do this for some time now, but when I priced it out with some nice thick molding, it ended up being like $40 or $50. Too much for my little budget :) So I never got around to doing it. I could have done the 1x4 way like how I did it in my guest bathroom, but that was more 'rustic'. And I just wanted clean lines for my master bath.
DIY Framed Mirror

Then I realized that I didn't like all the fancy molding more than I liked just plain boards :) So why not just do plain boards?? At under 70 cents a foot, it's a good deal. Especially when I had 19 feet to go with. I decided to buy some 1x6 mdf that you can find right by the molding. I love it because it's so thick and substantial. My mirror measured at 74"x37". You can buy these by different lengths, so I just bought 2 of the ten footers. Home Depot and Lowes both have places where you can cut the molding, so if you have your measurements, you can cut them there. They even have a miter box if you want to do your miter cuts there too :)

Here's how you do it: So, first paint the molding. These ones were already white, but it's just primed, so I just gave them a couple coats of some top coat.
 For the back, paint about a quarter of the side that would be in the inside of the mirror since you'll be able to see it's reflection just a bit when its finally on the mirror. The painted side will be your shorter side once you miter cut it.
 Once all the paint is dry, send it through your miter box or miter saw at a 45 degree angle for each side. Making sure, once again, that the painting backside edge is the shorter edge. Your cuts should be the same on each board and one side should be a cut at this angle \ and the other should be a cut at this angle /. So your board should look like this \________/ but with a top edge :) and that bottom edge is your painted backside edge.
 Now with the boards cut and ready to go, take some waterproof silicone and run some along the none painted part of the backside of each piece.
 Place the bottom piece first, secure with some painters tape.
 Then the side pieces next.
 And then the top piece. The best way to make sure these are all aligned and straight is to follow the outside edge of the mirror itself. The outside edge of the molding should be flush with the edge of the mirror.
 This dries pretty quickly, but I usually won't take off the tape for a couple of hours or so.

For the edges, if you cut your cuts perfect, you shouldn't have to fill them in, all you need to do is maybe take a quick paint brush to it. But if the edges aren't perfect, just get some wood filler, fill in the gap, dry, sand, and paint.
 I can't believe the difference this made in my bathroom. (don't mind the lovely hardwater stains all over the counter and faucet :) ). On that note, I'm thinking I would love some nice new shiny silver/chrome faucets...and maybe not so dark of countertops :)
Framed Mirror Tutorial
 It is so much brighter in here now. And it finally feels finished. I've been living in a complete non-decorated space for 4 years now. You would think that this would be the first bathroom I would 'freshen' up but it's the last :( I guess it's just so daunting. And it gets dirty really quick so maybe I think it's all for not. But....maybe...just maybe...with it all decorated now, it'll stay clean :)
Framed Builder Mirror
 So, here's the before of the bathroom mirror. Long..very long...and boring :) And the counter...well I won't get into the counter mess lol

 I can't get over how nice and bright it is in here now, especially with the new blinds and curtains. It was always so so dismal in here before. You have no idea. It was gross too :) I never used the bathtub, so that just got dirty way to quick, full of dust and grimy dust. The worst kind :)

This is with the lights off and blinds open just a bit. Heaven :)
$13 Framed Builder Mirror 
I can't wait to get ready in here now :) Before, it was like...in and out. Get your business done and leave. lol
It's amazing what little changes can do. So the total cost of this mirror project? Just under $13. :) It would be super cheap if your mirror was a fraction of this size, once again, this is over six feet long.


This posted is sponsored by:
(click to go out check out there inventory! Really beautiful stuff )

Monday, May 13, 2013

Chiffon Cup Cakes {not cupcakes}

Pin It
Happy Mother's Day to all you moms out there! It was my first Mother's Day and couldn't have asked for a better day :)

Chiffon Cup Cakes
So, I am the baker in the house. Definitely not a cook. It's funny how the two do not go hand in hand :) If it weren't for my husband, I would be living on a cereal and eggs diet (hey, at least I can cook eggs, right?). And if it weren't for me, my husband would probably be twenty pounds lighter :) I love to bake, and usually it's late at night when I have a sweet tooth and there's nothing in the house so I have to bake something.

We were watching an episode of some cooking show the other night and they were making something yummy. So, of course, I had to go forth and make something yummy to satisfy my sweet tooth :)

I bet you can probably make these "cup cakes" with any ol' cake mix, but I decided to try a chiffon recipe that I grabbed from my America's Test Kitchen cookbook and tweaked just a bit.

Here's the ingredient list:
1 1/2 cups of sugar
1 1/3 cups of flour (I used cake flour)
2 tsp baking powder
1/4 tsp salt
5 eggs (separate yolks from whites)
2 eggs
3/4 cups of water
1/2 cup of veggie oil
1 1/2 tsp vanilla extract
1/2 tsp cream of tartar

Combine sugar, flour, baking powder and salt together in large bowl.
In separate bowl, combine 5 egg yolks, whole eggs, water, oil and extract.
Add wet mixture into dry mixture. Whisk/mix until well combined.
In another bowl combine egg whites and cream of tartar. Beat at medium speed until stiff peaks form. This was about 2-3 minutes for me.
Add egg whites into mixture, folding in.
Heat oven to 325 degrees. Get 12 coffee cups (oven safe) and pour mixture into each cup until about 3/4 full. 
Chiffon Cup Cakes
Bake for 30 minutes or until toothpick in center pulls out clean.

Chiffon Cup Cakes
You can eat them like this, or let them cool a bit and pull them out of the cups. You may need to loosen with a knife to get them out.

For the frosting, I just took some cream cheese frosting I bought from the store, heated it for about 10-15 seconds and drizzled it onto the cup cakes. Yummy :)
Chiffon Cup Cakes
These tasted so good! I wish I hadn't halved the recipe...but maybe that was a good thing :) These are pretty big, and eating more than 3 in a day may be a cause for some serious guilt lol
Chiffon Cup Cakes

Thursday, May 9, 2013

Cleaning Dog Hair Off Of Carpet

Pin It
We had the little babe's blessing this past week and of course that meant a lot of cleaning. More cleaning than I ever wanted to do lol. I guess it was a good thing though. I didn't realize how nasty some corners of my house got. Plus it got us going on the yard which was much needed :)

The only thing I want to change about my house (besides getting more closets) is getting hardwood. Anyone with dogs that shed will understand this. The amount of hair Max sheds could create another dog every week. It's insane. So, of course, I feel really really bad when people come over and get hair all over themselves. It's inevitable but I think for the most part family and friends have figured that out. So that's good. But still. It would be nice to get all the dog hair up instead of just seemingly pushing it further and further down into the carpet. I figure with hardwood floors, it would be so much easier to clean up :)

I figured out the best way to get hair off of a couch in this post. So, what's the best way to get it off of carpet? Believe me, vacuuming only does like 10% of the work. Maybe I need a new vacuum??? It picks up practically everything else, so I'm not sure. Anyway. I needed a lot more of this hair picked up than what the vacuum does. I found a good little idea on Pinterest and decided to try it.

I took an old squeegee that I bought forever ago and never used for anything. Not that that matters, but at least it came into good use :) I forgot I even had it lol. Then I started squeegeeing the carpet. Yup. Weird? Yes. But did it work?
Remove Dog Hair From Carpet
 You tell me! I did this after I vacuumed. And this was just a 10 inch radius area. Crazy huh??
Remove Dog Hair From Carpet
Disgusting too lol. I'm not sure about doing the whole house like this cuz that would just take forever, but doing the main areas of the house was totally doable. Maybe I should have kept all the hair and created another dog?? just kidding lol. Even though this worked, I still want hardwood floors though :)   Any other tips for getting dog hair off of stuff??

Thursday, May 2, 2013

Remove Hard Water Stains With Vinegar

Pin It
We have really hard water in our house. Like super bad. It has ruined all of our dishes and silverware, our nice knives, the faucets, the sinks, the shower, etc. etc. I know we should invest in a water softener, but we just haven't yet. So, we live with it. When guests come over, instead of using our best dishes, we do the whole red solo cup and plasticware thing :) It's wonderful lol. But really, it's just plain embarrassing how our dishes always look dirty. I have tried everything, and nothing seems to work. I even tried vinegar once, but that was putting a cup of it in the dishwasher. Didn't really do much. But....the vinegar I guess needs to be more potent because it really does work :)

I just took some vinegar I got from the store, put it in a cup and put my silverware in it. Left it there for a few seconds. Took them out and wiped them down.
 And tada!!! What a difference! I can't believe they look like this. I was seriously about to buy new silverware and really all it took was just a few seconds of being in vinegar.
 So, once I realized the vinegar had such a great effect on my silverware, I was wondering about a few other things. So I tried it on our cups. All I did for this was soak a towel in some vinegar and rub the cup with it. Then I rinsed the cup with some water. And what.do.you.know! It worked too :) See the difference! Now you know why we did the whole red solo cup thing with guests :) They were nasty!
Another glaring spot in our kitchen encrusted with hard water stains is the fridge water dispenser. It was seriously caked on with white gunk. Once again, I just dipped a towel in some vinegar and rubbed it on the tray and voila!
Vinegar is seriously my new best friend! Is it bad that I'm so excited to clean the bathrooms now? lol. I can't wait to see our once brown water stops that are currently completely white :)

Another good thing? The hubs will stop cleaning our dishes with CLR. That stuff can't be good for you. I cringed every time he pulled it out. Vinegar is a much healthier choice :)

Monday, April 29, 2013

Easy No Sew Curtains

Pin It
 Hey all! We've been off adventuring over the past week. So, sorry I've been a little MIA. We took the little babe on her first adventure away from home...and her first really long road trip. I wasn't sure how it was going to go. I was a little nervous and pretty much just wanted to stay home. But luckily I have a great husband that forces me out of my comfort zone :) She did so well in the car ride! I was so surprised. She could care less that she was sitting there for hours. And let me tell you, car rides go a lot faster if you have a little one to stare at the whole time:) It was fun finally getting to play out in the sun (minimal sun of course). She loves it outside, it's fantastic. She squeals and talks at everything lol.
Can you believe this little bean is only three months old?? She's standing and holding her own weight already and sitting up like a pro. I'm just amazed....besides the fact that she is so big! She's almost 17 lbs already!
 While we were out in the heat and sun, we of course had to get her her first sunglasses too :) She loves these. Doesn't care that they are on her. We put them on, and she just giggles with excitement. It's the cutest thing ever :)
The vaca was much needed. I meant to bring my laptop to keep up on things, but totally forgot it...so it was a real vacation :) It was wonderful actually. It's amazing how wrapped up in technology you can get. On a sad note, I got a horrible bout of food poisoning the last day, so that kept me out of the loop for like 4 days. I didn't know it took that long for it to get out your body. It was horrible.

 I also have a fun little announcement to make. I decided to start another blog :) It's chronicling my way through motherhood. It's very new, so if you go visit it, beware :) I'm still in the process of getting it up and going, but I have started some posts. So now you can follow along with my confessions as a first time mom. It's call The Baby Files, just click here to go check it out and follow! or go to www.thebabyfiles.com.
Anyway. With all of this craziness, I'm just going to share a relatively simple project :)

I've been wanting to redecorate my bathroom for awhile now. But haven't. I have no excuse. I'm just lazy. lol. I wish I had earlier though because what a difference the color change has made.
Easy No-Sew Curtains

 First, we bought some blinds, which were much needed and practically 4 years too late. Just that alone made the biggest difference. But I wanted to soften the area with some curtains too..and not the ones that were up there. They were dark and heavy....I think I posted about them in one of my first posts, here. And I am ashamed to say, that post was about 3 years ago, and my bathtub/bathroom hasn't changed a bit since. It's been completely neglected. Yet, I'm in there all the time, so you would think I would want to keep it fresh and updated.

Alright. So back to the how-to on these no sew curtains. What you need:
Fabric-about 4 inches longer than what you need from your rod to the floor.
Stitch witchery (I just use the stuff that I always have left over from my Ikea curtains, or you can buy it by the fabric aisle)
Scissors
Iron

For each panel, I cut in half along the fold from it being on the bolt. This gave me both equal width panels, and of course, the same length.
 Now, for each side, fold over and iron down about an inch of the fabric.
 I'm OCD, so I wanted my panels to match perfectly. So, on the second panel, I folded down the fabric to match where the design was folded down on the other fabric. Make sense? If you look below, you can see what I mean, especially if you look at the little circle type things. Those are both equidistant from the the fold on both panels.
I did this on all sides.
 I then got my stitch witchery, put it in the fold and ironed it in place. I did this to all the folds once again on each panel.
 In order to hang it, I took my rod and put it on the fabric and folded the fabric over it, about 3 inches or so. I then used some stitch witchery to secure the bottom inch or so in place so that the rod slides easily back and forth. I did this to the other panel.
 Now if you don't want to thread the rod through, you can use cafe clips to clip onto the fabric and then thread the clips onto the rod.

I got this fabric from Hobby Lobby. I seriously wish I had blinds for the past three years. I didn't realize how much brighter my bathroom would be.
No Sew curtains
 I have a few more ideas for this area, some of which I may or may not do depending on how it looks. You know how that goes, you have an idea in your head that can either be way awesome, or turn out completely weird. Well this is borderline weird already. So, we'll see lol.
Easy No Sew curtains
Have any fun vacation plans in your future? We'll be taking the little on her first plane trip in a bit. Anyway tips for that??? That's going to be a whole new experience on its own lol
Related Posts with Thumbnails