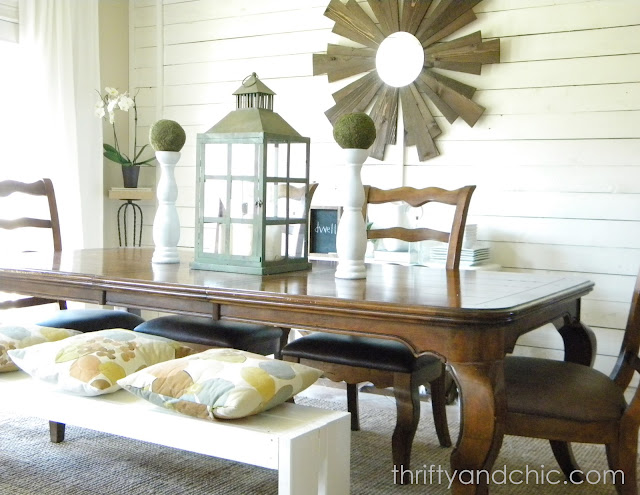
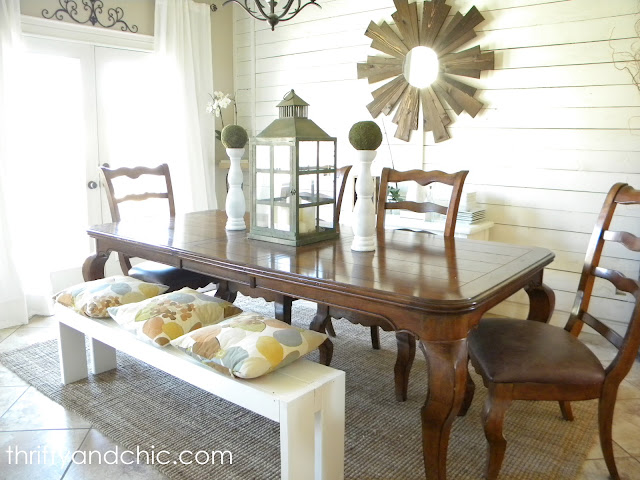
Sorry this is a bit late going up since I promised it yesterday, but here's the new addition to our dining room - a farmhouse bench! Can I just tell you how much I love this??? Good heavens, the amount of space it has opened up, even though its just visual space, is tremendous. Plus! Its super easy to make...and super cheap :)
My measurements are geared toward what I needed for my table, so you can take the plans and make yours higher, wider, smaller, etc. from there :) Since this table has a leaf in it already, and sometimes we take it out, and sometimes we add another, I needed to make the bench size perfect for all lengths the table could be. I made sure to measure what the table would be at its smallest, took a few inches off from there and used that as my measurement for the bench.
Here are the cuts and supplies you'll need:
- Two 2x6s -Cut to length of bench (61" for me)
- Two 1x4s -Cut to same length as above (61")
- Four 2x6s -Cut to 17" (Normal height of a bench is 18", I cut mine short 1 inch since the table was a little lower)
- Two 2x2s -Cut to width of two 2x6s together. Each 2x6 is really about 5.5 inches wide, so multiplied by two gives you 11 inches. Make sure you measure your 2x6 width though because some are off a little by a centimeter or so.
- Two 2x2s -Cut to 3.5 inches long.
- Wood glue
- 2 inch screws
- 1 1/4 inch screws
- Drill/Screwdriver
- Wood puddy
- Sander
- Paint
Next, measure from the top 1.5 inches, or just put a piece of 2x6 or 2x4 flush along the top edge for the measurement. Place one of the 2x2s cut to 11 inches underneath the 2x4/2x6. Draw a line to make sure you keep it in place when you start drilling. Also, you want the 2x2 to sit about 3/4 of an inch inside the two side edges. I used a 1x4, put it flush against the long edge and drew a line down intersecting the previous line. Then I just made sure to keep the 2x2 right in the intersection of the two lines. Does this make since?? lol
Okay. Wood glue the 2x2 into place and when dry, drill 5 holes, two into each 2x6 and one into the 2x2. Screw your 2 inch screws into place. You can see from above what I mean about 1.5 inches down 3/4 inches in.
Now do this whole process again with the other like size pieces of wood.
Now, lay down the two 61 inch 2x6 pieces on a level surface. Push them together so they are touching.
Place one of the complete pieces you did in the previous step on top of one of the edges of the 2x6s, as shown above. Wood glue together.
Then drill your holes and screw into place. Do this to the other side.
Next stand the bench on its side and lay one of the 1x4s along the edge to make the 'apron'. Wood glue the edges together. Then use a countersink drill bit to drill a hole, then use your 1 1/4 screws and screw in. Do this on the other side to both ends.
Once I was done and sat on it, one of the legs felt a little wobbly, I looked at the wood and noticed it was a little bit warped. This may happen to you. I was able to fix it with sending a screw through the outside edge of the 2x6 leg into the 2x2 underneath. This stopped the wobbliness. Just make sure to countersink your screw so its hidden!
Next, use your wood puddy to fill in all the holes and cracks you wish to conceal.
Now time for sanding! I kept in mind that this is 'farmhouse' so I wanted to keep some of the wood characteristics intact so I just sanded away the obvious sources of possible splinters to the butt, and rough edges from cutting the wood. I don't get what it is with Max, but he loves to be by the sander. lol. I think he loves the air that it gives off :) He wouldn't stop sniffing it.
Now paint it your desired color! Of course, I painted mine a linen white :) I was worried about the white for a little bit before, I was actually thinking of staining it a brown, but then matching the brown to my table would have been disasterous. lol. So I kept it white, and I'm so so glad I did.
It really opens the whole space up and moves the white from the wall to this side of the dining room, which was definitely needed. Also, it offers up so much more seating. This table is humongous, but the chairs are also humongous. When you have the chairs, you can only sit 2 people on the side, but really if they were normal chairs, you can probably get at least 4. This bench can now easily sit four. I almost want to make one for the other side to get more seating space out of the place, but I think that may be a little excessive and I like how it looks just on one side :)
I'm also loving how it now opens up into the living room. Before the chair backs cut off the space, now it flows really nicely. The white bench also ties the living room into the dining room perfectly.
I know I have said time and time again how much I want to make another table, mainly because the brown of this table was just to heavy for me, but now with the bench here, it helps with the lightening of the space; so I can probably hold off a little bit on the table for now :)
But! I'm crossing my fingers, cuz a new table is in my near future which I am sooo excited for :) This time, its an patio table. Which means, we are finally getting our patio done! Woohoo! lol. Its been 3 years in the making. I've been living with a big rectangle of mud, dirt and weeds outside my backdoor and I can finally see the end :) Finally.
Oh, and the cost of this bench for me was the cost of two 2x6s which is about $9. If you need all the wood, you would just use two 2x6s, two 1x4s, one 2x2. So about $15.


We did this too! We did it for the extra seating as our family was outgrowing the amount of chairs we had. For the cushion on the bench we took a 2 inch thick piece of foam and cut it to fit, then covered it with fabric & plastic. (had to do the plastic to help the new cushion withstand 3 kids 6 yrs old and younger). Yours looks great!
ReplyDeleteI have been thinking about doing something like this for a while but I keep putting it off. Now I HAVE to make it! I think it looks great and I agree it ties everything together in your space so well! Awesome job! And congrats to you both! :)
ReplyDeleteYou got me thinking I need to make one!! Yep- I LOVE how it opened up your space! The perfect fix and looks great!
ReplyDeleteOh man this is so cool! I am going to have to make one and your directions are so great! What paint color are your walls, I've been looking for the right shade and haven't had any luck? its beautiful!
ReplyDeleteLove the whole look. Put together beautifully!
ReplyDeleteThis looks great and I love your mirror!
ReplyDeleteIt really looks great! I love the idea of benches for dining tables.
ReplyDeleteI also just had to say my parents dog is also named Max and looks almost IDENTICAL to your dog. He is a yellow lab mutt with gingery highlights with a brown nose as well... its kind amazing/freaky!
Hallo
ReplyDeleteI love youre blogg!!
Hug, Tine
Norway
Oh, I love it! Everything looks so pretty and put together! Just lovely! Thank you for sharing. Visiting from HOH. Would love it if you would share this at my Make it Pretty Monday party at The Dedicated House. http://thededicatedhouse.blogspot.com/2012/08/make-it-pretty-monday-week-9.html Hope to see you at the bash! Toodles, Kathryn @TheDedicatedHouse
ReplyDeleteLove the bench with the dining table, it looks so inviting. Loving your entire home :) I'm sharing at my Sunday State roundup.
ReplyDeleteLove your white linen curtains in your kitchen. Do you happen to remember where you found them? :) Thanks!
ReplyDelete