Hey hey! Are you ready for this? I'm not, ...mainly cuz now you all get to see how my office has been off and on for ummm..about two and half years? But I figure, my cheeks won't stay so red for too long cuz I think the after is beautimus. But of course I'm a little biased :)
So, as you all have probably figured out by now, my 'office' redo morphed into an office and guest room redo since I'll be redoing our current guest room for a nursery...No, I'm not announcing anything yet :) but a girls gotta get ready for things, right?
Anyway. I had to find a way for an office with a lot of stuff. And when I say 'a lot', I mean a TON of stuff to coexist in a room where guests will be laying their heads. So, as promised, here's the before shot of my office:
I didn't even clean this room for ya'. haha. You couldn't tell? Just kidding. This is sadly a little bit better than its been but somewhat of its worse. I use to have a big desk in the middle taking up a whole lot of space. Not the best decision I made. Well, that desk was moved to the wall and then more crap was put on the ground in its place. Its called compromise. haha :)
You see the problem here is that I also used this for storage. Storage of anything from unused furniture to decorating accessories. And then I some how had my business and normal home office stuff jammed in there too. Anyway. It was bad. Obviously :)
A few sweat and tears later, here's that corner after! I pretty much finished this all in a week. I knew once I got started, I could not stop. If I stopped, who knows when I would get back around to finishing it...I mean, remember the before??? Almost three years people, three years. Need I say more?
And then here's the other corner. haha. whoa. So in my attempt to make this even more of an office, like two years ago, I bought a desk for $20. It was waaaay to small for what I needed it for-see, you can't even see it. But I still used it....like maybe a good two months straight....and then it became a surface to add more crap onto. See that little brownish fabric thing in front of the desk with the candle on top? Yeah. That was my chair. I know I know...way too posh, maybe a little excessive? I only give myself the best ;)
After working around crap for years, I figured I would give myself a new chair and update my desk. A little cleaner, no? haha.I don't have to hop over stuff, and bust my leg against corners every two inches now to get to something.
So, how does one keep all her crap hidden and still have a nice room for a guest? With curtains! I bought some bookshelves from Ikea -my biggest splurge- piled on the crap and then hid them with a curtain attached to the ceiling. I did this on both sides of the window.
And then to connect the whole look, I bought another shelf from Ikea, put it on its side, topped it with some pillows, and voila! A makeshift window seat.
This added the perfect amount of space for 'guest' necessities -towels, bath salts, soaps, books, etc.
Eventually I'll get around to adding a foam seat...but I'm in no hurry :)
This is so sad, but before, I use to not be able to open these closet doors. It was THAT bad.
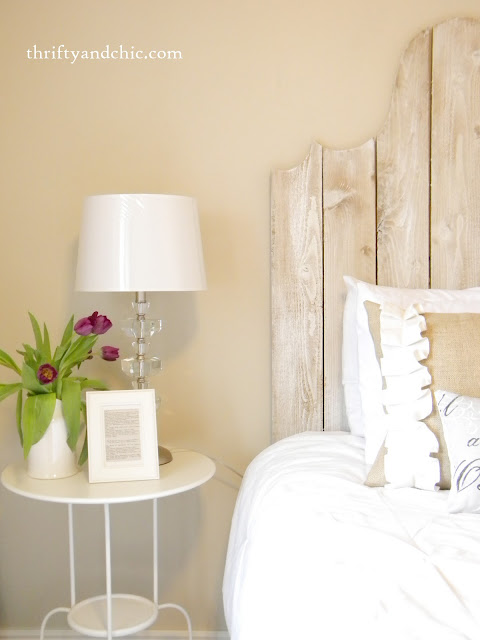
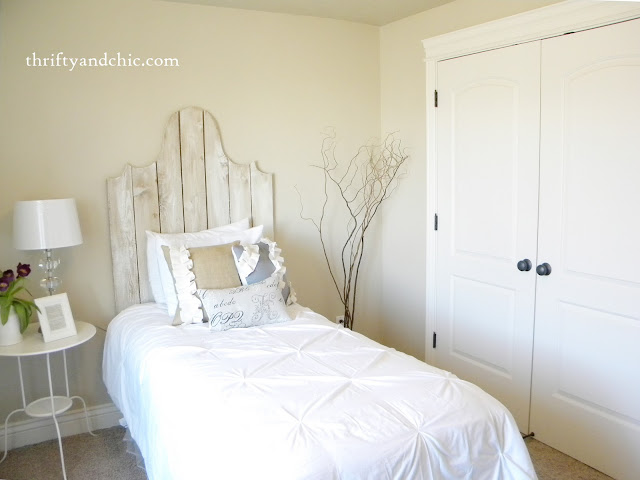
These pillows I made from scrap fabric. The headboard I made from cedar planks -tutorial here.
The lamp was bought from Target for 75% off. Score! The frame and table are both from Ikea. The pitcher is from my kitchen. Instead of framing a picture, I opted to frame a passage out of Romeo and Juliet -I figured it added the perfect amount of romanticism in my romanticism-esque room -at least that's what my 'french' fabric says :) Actually. I think it says, 'abcd' 'jklmn' 'k' 'r' 'lmno'. Some French, huh?
Here's the view when you first head into the room. Oh, and this rug I got from Ikea also...a long while back. Its migrated from two other rooms to find a home, for now, in this one :)
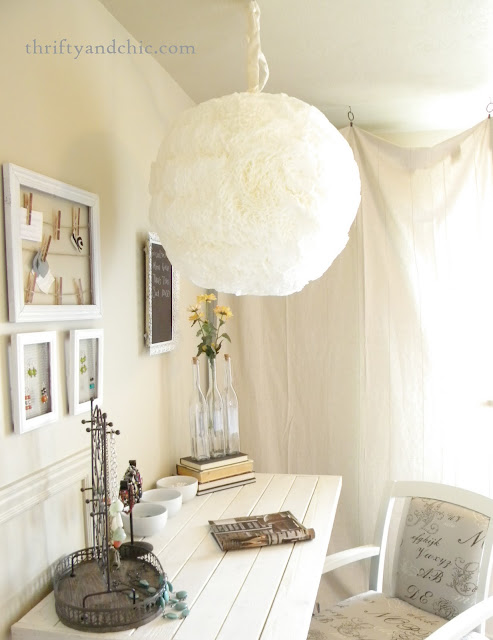
And here's the 'office' area again. As you can see I 'lengthened' the desk. I also recovered this salvaged chair. Oh, and of course, the big white ball... I mean, hanging light :) The tutorial for this coffee filter light is found here.
Well. Lets see how long this actually stays like this, shall we? haha. I know myself and I know my habits. I figure, something drastic had to happen to break said habits. I would clean and re-organize my office before, twice or so a year, and sure enough, the next week it would look like it threw-up on itself again.
When things aren't too organized, there's little in it for me to make it stay not too organized. I like to make it worse :) But the best things about these curtains? The stuff doesn't have to stay looking organized and pretty! None of my boxes and baskets match. Half my stuff isn't even in a box or basket. But you can't tell, now can you?
Eventually I'll go through the dreaded process of organizing all the stuff for reals. Maybe when I'm expecting more guests cuz if they are anything like me, I would totally open those curtains and go through stuff :) Its kinda like using someone else's bathroom and opening up their cupboards.... come on...you can't tell me that you have never done that??? haha. I SWEAR that I have never done that (wink wink).
So, the total cost of this $275. It would have been about $250, but I really wanted to replace the table I stole from my bedroom with another one, so I figured I should add this into the total cost. Here's the breakdown:
Headboard: $7
Ikea table: $20
Target lamp/shade: $30
Ikea Frame:$2
Bedding: $12
Bedskirt: $4 (those were Ikea mesh curtains btw)
Curtains -mesh and linen, Ikea: $24
Ikea bookshelves: $100
Ikea 'bench': $40
Hanging Light: $12
Desk upgrade: $5
Misc. Fabric for room: $20
Holy crap, I love Ikea -obviously, can't you tell??? Its either bought at Ikea or handmade, figures.
Now I would have made the bookshelves myself. In fact, the plan from day one was to make the bookshelves to save money. But then I remembered, that was the same plan as the plan from 1 year ago and 2 years ago. And look where that got me? I figure, if things are too daunting...and essentially make you not do what you need to do....then find an easier way to do it. Yes, it may have been cheaper in the long run to make the shelves. But my time and sanity is worth at least twice the cost of my purchased bookshelves ;)
If you have any questions on anything, let me know! I'll be posting about more projects and how-to's in upcoming posts.
Oh, and Happy Compliment Day! Yep. and it is also Beer Can Appreciation Day, just an FYI :)
Subscribe to:
Post Comments (Atom)


I am loving this!! I am goi g to have to combine my guest room and office soon and this is great inspiration! Nice job!
ReplyDeleteThis makeover is FABULOUS! The curtained off wall is by far my favorite part of the room- what a great way to hide storage! You did an amazing job- I'd say the after is definitely amazing enough to justify how long it took. ;)
ReplyDeletethank you! nothing better than being able to hide all your clutter :)
DeleteWOW this turned out fabulous you should be very proud, and yes there is NO place like Ikea...
ReplyDeletePattie
haha. I didn't realize how much stuff I have from Ikea until adding it all up. Its scary, really :)
DeleteThat looks awesome Alicia!!! I love the "makeshift windowseat." And the curtains to hide all of your stuff. Awesome awesome awesome!!
ReplyDeleteWow this looks amazing! You did a great job! Where do you put all of your stuff that needs to be stored away now?
ReplyDeleteI put it all back where it actually should have been in the first place...in the basement storage. I just hate going down into the basement, so instead I always took things up here, go figure -its not like it saved me any energy going one way or the other. I guess I'll blame it on the basement being too cold ;)
DeleteThat is just beautiful!!! I've pinned it so I can remember to do this - in about three years!!!
ReplyDeleteOh I hope it doesn't take you three years to finish!!
DeleteSO femm and pretty....great job girl!
ReplyDeleteXO~JD
www.jessiedmiller.com
Wow! That looks amazing. What a nice, comfortable space for your guests. I love the makeshift window seat with towels & other misc items. I can totally relate with having a "catch all" room for things.. you did a great job.
ReplyDeleteIt's beautiful! I love the headboard. The whole space is so calming and natural. Definitely an amazing jump from the before! Good work! I bet it's an amazing space to work/sleep in now.
ReplyDeleteWell done on this most gorgeous makeover and on a small budget too. You have combined you office space and guest room beautifully.
ReplyDeleteAnne xx
this is beautiful! I have struggled to find a way to utilize our guest room for various uses! I am loving how organized and yet romantic everything is! :)
ReplyDeletelooks great and your right your sanity is worth more than doing it from scracth great job
ReplyDeleteAmazing job. I would have guessed you spent WAY more!! I love all of these tips on how to decorate for cheap :)
ReplyDeleteBoy, that is some kinda guest room! (Hey, I will be overjoyed to spend the night there! LOL)
ReplyDeleteWonderful redo and on the cheap-cheap too! Good job!
Visiting from Under $100 linky party at Beyond The Picket Fence :) Thanks for sharing with us!
~Smiles, Suzanne in NW Illinois
Beautiful room!
ReplyDeletePlease check out the Valentine's Day movement, where I'd love for that day to turn into Random Acts of Kindness day.
http://www.vintagemauve.com/2012/01/26/random-acts-of-kindness-day/
If you are willing to do be kind on Valentine's Day, leave a comment on the post. Thanks!
Cheers,
Jessica
oh yeah...you rock! Love the bed...the hanging light... and the tipped bookcase. In fact, I did the same thing in one of my rooms. Those Ikea shelves are so stinking versatile!
ReplyDeleteWhat a beautifully romantic looking room! Never would have guessed its humble beginnings! I love the headboard and the light is just way cool!
ReplyDeleteWould love it if you shared your space at my Room Evolution linky party on 1/31!
Jenny
www.evolutionofstyleblog.blogspot.com
Chic, unique and romantic! You did good girl!
ReplyDeleteStop by the farmhouse porch when you get the time..
♥Linsey
WOW gorgeous! I have the same problem with our office, it is a guest room as well and a total disaster! It is next on my to do list and you have definitely given me some inspiration!
ReplyDeleteWow! What a transformation! I think this is what a lot of people dream of being able to do, but you think it costs SOO much that you don't even try. Until you find thrify and chic!! All that for under 300 is amazing!
ReplyDeleteJess @ That's Sew Crafty
Wow! This room! Looks fantastic! Great job! Tell me more about the desk...
ReplyDeleteGorgeous room!! I love the window seat!
ReplyDeleteThis is absolutely gorgeous. I love what you did with this room. It's just spectacular. Wonderful, wonderful!!! The bookshelves with the curtains and the window seat with storage are such wonderful ideas.
ReplyDeleteRuth
Oh my goodness, this room looks amazing! Such a great idea to hide the stuff on your shelves behind a curtain! I might have to stick that idea in my back pocket. ;) I really love the headboard and coffee filter light!
ReplyDeleteGreat job!!
Wow wow wow! Love this!
ReplyDeleteWow! What a transformation! I love your headboard! Thanks for joining the party!
ReplyDeleteblessings,
karianne
LUV this room, Alicia! So pretty! You outdid yourself, girl! :)
ReplyDeletexoxo laurie
Your guests will never want to leave! Just lovely and welcoming ...
ReplyDeleteThank you so much for joining our "impossibilities" challenge and link party!
Linda - itallstartedwithpaint@gmail.com
Great makeover and solutions for storage. So very pretty too. I noticed the bedding was listed at $12. Did you make the pretty duvet with the gathers or was that purchased. Thanks.
ReplyDeleteOkay, I found your pillow tutorial with the same look so I will assume you made this too. Thanks for sharing.
DeleteThis is so great. I love the curtains in front of the shelving. What a great upgrade. Congratulations!! And thanks so much for linking up to the challenge. Karah
ReplyDeleteYour headboard and that coffee filter light rock! All that style and on such a small budget - you're my hero! Thanks so much for joining our Impossibilities Challenge!
ReplyDeleteKelly
White color combinations with white colors wall and bedsheets is look so wonderful and fabulous.
ReplyDeletelyrics of song
Seriously, you have done an amazing job. It is so beautiful. I want to visit. SpecialK XoXo
ReplyDeleteYour fabulous guest room/office is being featured at the Imagine the Impossibilities Challenge!
ReplyDeletehttp://www.eclecticallyvintage.com/4/post/2012/02/imagine-the-impossibilities-fabulous-features.html
Kelly
Love it all! The headboard, pillows, curtain hardware & clever storage...will you come over and redo my junk room?? I'd love it if you'd share this at my Show & Tell party, going on now @ the Delectable Home.
ReplyDeleteLove your room! You've got some great ideas here - and that headboard is FAB!
ReplyDelete-Revi
This is the most gorgeous office/guest room..beautiful!
ReplyDeleteI adore this. Like..I can't even tell you how much.
ReplyDeletePutting the bookshelves on each side of the bench & layering them with those curtains? Genius!
OH my gosh...I love this room! It is so beautiful and peaceful and romantic and...ahhh! I especially love the grey gathered pillows on the window seat. I can't wait to go and read your tutorials. You did a fabulous job...seriously.
ReplyDeleteGorgeous!!! Any chance you remember the name of the rug from ikea?
ReplyDeleteFabulous room! When you have guests, they will never leave.
ReplyDeleteFan-flippin-tastic! I love, love, love, what you've done! I especially relate to your natural tendencies towards messiness and the desire to overcome it. I'm so with you there! Really beautiful job. I'm RSSing you for sure now!
ReplyDeleteWhat a fantastic and thrifty make over. I have been looking for an idea on hanging some panels to create a separate sleeping area in a large studio apartment, this will do it! Thank you.
ReplyDeleteBeautiful AND functional! And OMG I love love love your window seat!
ReplyDeleteGreat idea to hide the shelving....that's what I do with our closets sliding doors...they just look better purtied up!
ReplyDeleteI love the bedding you used on your guest bed. Was that from Ikea? Do you remember what the name was? I'm trying to find something just like that for my room. Thanks!
ReplyDeleteI actually made it from two sheets. Here's the tutorial on how to do it: http://www.thriftyandchic.com/2012/02/diy-puckered-duvet-cover.html
DeleteGreat inspiration for my "office" corner that is in my masterbedroom. My husband has an old teachers desk in our guest room. His grandparents bed, that was ours for over 10 years, is the guest bed. I wish I make that room more girly but the master bedroom has pink walls so I'm happy. :)
ReplyDelete