Update::: click here to see the full reveal!
So I finally just finished the whole re-do organization decrapification of my office. It was a pain in the keister...but I survived :) And now I finally get to enjoy it! So, as I said before, throughout this whole process there were a ton of projects. Enough so that I can blog about them for over a year :) So, with that said....here's the first one:::
...the show stopping piece! haha. Just kidding. Well, I guess it is the biggest thing in the room and first thing that you see when walking into the room...so I guess it can be show stopping :) I retract my previous statement.
So, I have been perplexed by all these coffee filter crafts, wreaths, and covered lampshades that have been going around. Who knew that something so beautiful can come out of something so simple as coffee filters....go figure. First off, who thinks of coffee filters as a craft necessity? Its amazing these creative minds that are out there.
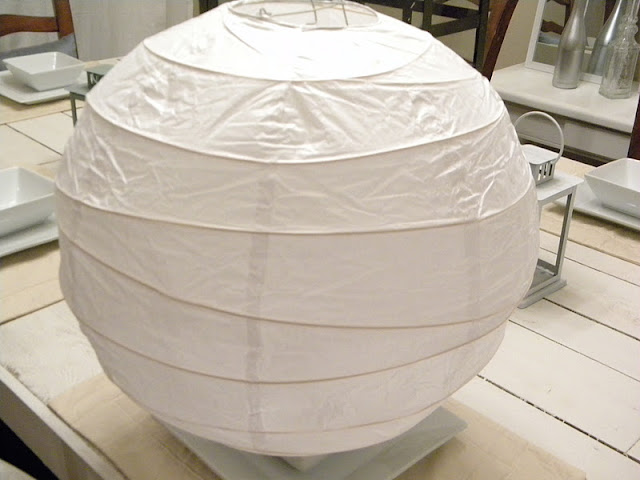
So the story starts....I was in much need a better lamp for my itsy bitsy desk. The one that was currently on it didn't match the style of the room at all. So, I went to Ikea to get something...or search for inspiration. Sad to say, but it was like the third time I had gone to Ikea in a seven day period :) I love that place! haha. Oh, and let me tell you...not all things at Ikea are cheap :) $30 for a lamp shade??? umm...I think not. Anyway. So I decided, in order to free up some space on my desk I should get a hanging light. So I picked up one of those light bulb sockets connected to a long long cord. Good enough description for ya? I bet you knew what I meant though, huh? Well, then I saw the section of the hanging light shades. Did you know they make a paper one that looks like a floating pillow? Its awesome. A little...should we say..'different'. Anyway. So, right next to the pillow I found this baby, not quite the style I wanted, but it would work....
then when I got home to put it up, I remembered Allison's lamp she made out of coffee filters and figured...what the heck! Lets try it on this baby.
And so the process began. And when I say process....I mean like 6 hours of hard core labor :) not really hard core....nor labor. But my thigh did get a little bruise on it from folding the 800 coffee filters on it. Yes. 800. and yes. 6 hours. Thats just a warning in case you want to attempt to make this. It might have been closer to 8, I lost track cuz I had to do it throughout a couple of days. Oh, and I'm pretty sure I used 15 glue sticks. You think I'm kidding, but my lack of glue sticks currently on hand says that I'm not.
So, to get things started, I folded each filter like so. In half once, then in half again. I guess that would be quartered. And then I flipped up the point just a little bit and creased the bottom. This is what I did on my lap that gave me the bruise.
Next was to start hot gluing these babies onto the paper shade. I put a dollop of hot glue on the bottom side of the little 'triangle' on the coffee filter and pressed it in place. I then glued the next filter sort of on top of the already glued triangle section of the first one. Don't glue it like super next to it, but still have it overlap and let the top of the filters touch. Make sense?
I didn't quite know where to start gluing the filters so I started in the middle and started going around the globe, then I thought it would be fun if it weren't such a straight light so I made it swoosh up to the top. Once I did this, I thought I had ruined it.
Cuz then I ended up going the opposite direction I wanted to near the top hole. Luckily, these filters a malleable and I just kind of corrected it in slowly going the correct direction again and circled the hole. I then went the opposite direction to the bottom hole and did the same thing. Next I just started following the same path I had created and glued filters right next to the others...kind of following the same line, kind of not. At the end, it was more of just putting filters where there were empty spots and making it look nice.
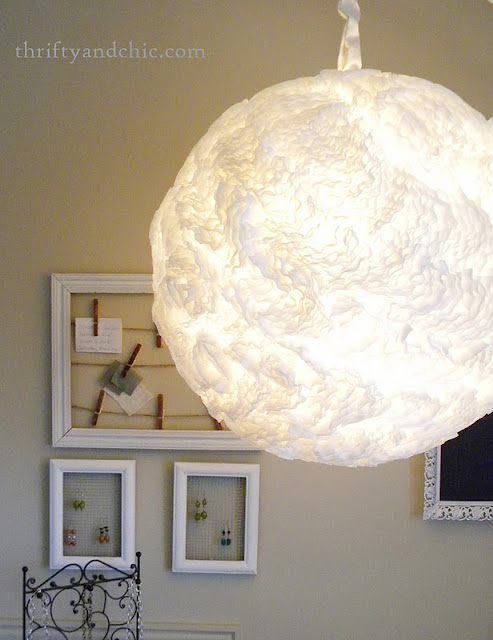
As you can see, it didn't matter where I started or ended or what direction I went, the lines blend into each other. So I would say, just start wherever in whatever crazy design you want, you can't go wrong. I seriously almost stopped this project cuz I thought it was going to turn out retched. But in the end, it turned out beautiful!
As for the cord, I used this tutorial to cover it, and then just strung the finished cord through a hook on the ceiling.
This is it all lit up. It generates a good amount of heat. I'm not sure its from the light bulb I'm using, but I suggest using a lower wattage, just in case...and I wouldn't leave it on for forever. I won't be held liable for any random fireballs falling from your ceiling :) haha. Actually, I guess thats not a kidding matter. Lets just say I've had mine on for a good three hours now and its still okay and not warm to the touch at all, unless you put the hand inside the hole.
So total cost for this project was....variable. $4 for light cord, $5 for paper shade, about $5 for coffee filters, and all the glue I luckily already had on hand. So, lets round it to $15. Plus all the labor....well, actually, lets not even go there :)
UPDATE: View the other half of my office here. And the how-to on my wall organizer here.
Subscribe to:
Post Comments (Atom)


very pretty! I love it! :)
ReplyDeletebeautiful! thanks for sharing!
ReplyDeleteI started a lampshade and gave up about halfway through it...now I'm wishing I would've kept at it.
ReplyDeleteGreat job.
It turned out SO great!! I cannot wait to see what other fun posts you have for us!!
ReplyDeleteThanks for the inspiration,
Dani
I love it! I also love the fabric on your chair! Did you happen to get it at Hobby Lobby?!
ReplyDeleteThat's beautiful. I love it!
ReplyDeleteAlica, this is really stunning, Loving the look of your office
ReplyDeletei love it great idea
ReplyDeleteIt looks fab - reminds me of my round capiz shell light - great job!
ReplyDeleteKelly
So pretty! I can't believe how cool that looks. I might have to do this for my guest bedroom.
ReplyDeleteI love it! Especially beautiful when it's all lit up! I find that some of my best projects are the ones I'm thinking of chucking half way through : )
ReplyDeletemaxwellhouseinteriors.blogspot.com
That is just too cute! It reminds me of a giant cotton ball!
ReplyDeleteGreat idea. It was absolutely worth your effort.
ReplyDeleteI was wondering if 800 filters was crazy, but then I saw it all lit up and think it is awesome! Thanks for sharing!
ReplyDeleteWow. I am impressed by your dedication! It looks so pretty and perfect for the space!
ReplyDeleteOMG, this is amazing! Such a cute idea!
ReplyDeleteI am soooo going to try this for my teenage daughters bedroom. She has a ceiling fan/light and IMO it doesn't go with her room at all... Now to find the paper shade for a reasonable price..I have everything else )
ReplyDeleteWho would have thought you could make something that cute from regular coffee filters..inspired to look around my home for decorating ideas!
ReplyDeleteSarah
www.budgetfriendlydecorating.com
That is truly so pretty! I love it! I have coffee filter pom poms and paper lanterns hanging in my daughter's room, but not together - it's genius!! Enjoy your pretty space.
ReplyDeleteOK this is the best idea I have seen in a long time... Great job. Love your blog and can't wait to see more of what you do. I am your newest follower, Have a great rest of the week
ReplyDeletePattie
Oh my, what a beautiful space. I love the light, it came out great! Have you had a chance to check out our little Challenge? It's not too late to join. If you have a second, check in at http://thespacebetweenblog.wordpress.com/2012/01/09/imagine-the-impossibilities-challenge/ to learn more, and feel free to email me if you have any questions!
ReplyDeleteKarah @ thespacebetweenblog = your newest follower
love your blog!!! this lamp is so classy!!
ReplyDeleteThat is so cute!! I want to try this!
ReplyDeleteSo many wonderful ideas on your site and I love the way you give a step by step guide for each. Thanks for sharing!
ReplyDeleteUm... GORGEOUS! Why in the world didn't I think of this? I am going to make one immediately. It's not creapy at all to say that I think you and I should be best friends because our taste is very similar, right?
ReplyDeleteZoe
www.designsbyevergreen.com