I can't believe Labor Day has already come and gone. That's like the official last day of Summer! Holy moly, where has this year gone? I'm going to say something here that is going to blow your mind...we are into the 3 more months and counting stage to get to Christmas. Yup. And your welcome :)
Now onto my next project...not Christmas related, thank goodness lol. While redoing my front room, I realized that I needed a different piece of decor to go on the planked wall. I loved my poster board mirror, but it was just....blah..too white. I needed a little bit of color (a little bit of color is a relative term here. More color = cream/beige/tan/grey). So, after lots of brainstorming, I finally came up with this idea using nothing but stuff from the hardware aisle :)...paint sticks and rope!
Here are the supplies you'll need:
18 paint sticks
3 packs of rope (at least of the kind I used...I got mine from walmart in the hardware aisle)
Round wood piece (got mine for a buck)
Small round mirror (can find these at hobby lobby)
Paint
Hot glue
This is a picture of the rope I used:
Step 1: Paint your sticks! Or if you are like me, you may end up painting them twice :) you'll see in the below images when I changed my color...nothing like redoing all your work or anything lol. Also paint the wood piece
Step 2: Layout the sticks. I used 18 for mine. You can use however many you think. If you have a larger mirror, you'll need more, smaller, less. If you follow my weaving pattern, you'll want to do an even number of sticks. If you do an odd number, and go under and over, it will make one row each rather than continuing the same pattern. You'll have to experiment on your own :)
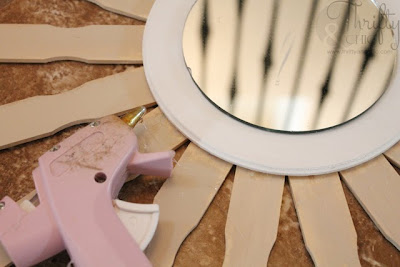
I spaced mine out with a glue stick to get the same distance between each stick.
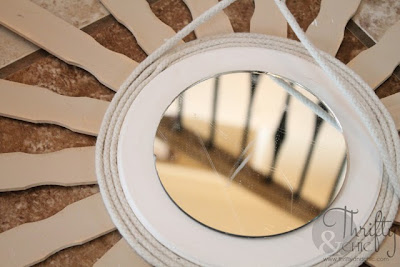
Step 3: When the sticks are in the perfect circle (as perfect as you can get), lay some hot glue down on them, and then press the wood circle directly on top. I should have said this before, but make sure that your paint sticks fit about an inch onto the wood circle, so don't make the circle too big when laying them out. Now, glue the mirror on top of the wood circle, make it as center as possible.
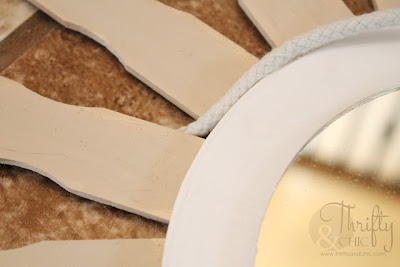
Step 4: Now get the end of the rope, glue it underneath one of the sticks and then bring it on top. I decided to do the first few rows non-woven, so I just went in a circle, hot gluing the rope onto each stick.
 |
| and why yes, this looks like a sailing wheel :) |
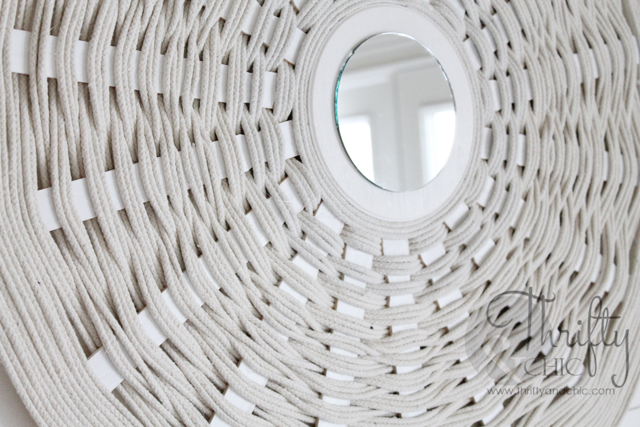
To start weaving, just go underneath one stick and top of the other. I started doing three rows on top, an then three on the bottom.
To reverse, go underneath 2 sticks instead of just one, and you'll start having the rope on top of the paint stick where before it was going underneath. Make sense?
The way I wove mine, didn't make any sense :) I did a couple rows of three, and one row of two, and then a couple rows of three, and then one row of two again, and then I gave up and just did rows of three.
If you run out of rope, which you probably will, just end the rope under a paint stick and secure it would hot glue. Then start the new line of rope right by it.
Once you get towards where the paint sticks are spread out more, you'll notice that the rope will start to bunch up on itself.
If this happens, just make sure you glue the rope back into place. For most of the weaving, at least at the beginning, you won't have to do much gluing because it will stay in place on it's own.
Towards the end, I went back to the rope being all on top to finish it off, gluing the rope to each paint stick to make sure it stayed in place. If you run out of rope on this part, you can't really go under the paint stick with out being too noticeable, so just end the rope, glue to the top of the paint stick and start again. Try to make your cuts nice so it blends in.
You'll notice once you get towards the end, that some paint sticks are longer than the others....well, more so that you have more room on some than the others. If you run out of a place to put the rope on one paint stick but still have other paint sticks showing, on that particular paint stick, just glue the rope directly to the rope next to it since you won't be able to glue it onto the paint stick. Make sense? I had to do this a few times around my mirror.
Once I couldn't see the ends of the any more paint sticks, I just finished off by tucking the rope underneath, and hot gluing to the underside of one of the sticks.
Step 5: Hot glue some hardware for it to hang. This mirror isn't to heavy, so I trust hot glue to hold it in place just fine :) I hot glued it to the stick and to the rope it's tucked under. If you are concerned, then nail it into the wood piece.
If you aren't like me, and stopped and undid half the work you already did because you decided to change the paint stick color, you can probably do this in an hour to an hour in a half. It's a pretty big mirror too, about 30" in diameter.
The cost of the project for me was the cost of the rope, which is about $3 for each bundle and then the dollar for the round piece of wood. So, a total of $10. If you need all your supplies, you are looking at maybe $12. Plus! The paint sticks are free. Just go to Home Depot and ask for some. They will give them to you, they have no way of ringing them up or charging you for them. But be kind and ask :)
On that note, I was Home Depot the other day, and saw a lady with literally a cart full of paint sticks. A whole cart! .....Now I'm not too sure about that.....Taking 20 of them made me feel guilty and I even tried to buy them, I'm not sure about a thousand of them (or more)...but to each their own :)
The hubs and I agree that this looks like a flattened out basket lol. But, I actually like the look of it. It brings in a lot of texture :) Him? not so much, apparently its "not his style". Can't make everyone happy :)
Now on to the fall decorating! I'm soo excited to finally start decorating my porch. For whatever reason, I'm not one to decorate my porch for any other thing besides fall and Christmas :) ... I should probably change that some day lol.
linked to: remodelaholic


Love this tutorial and nice to see a unique looking mirror. I think it looks great! Thanks for sharing.
ReplyDeleteOh my gosh! I have a bamboo and rope mirror that looks related to your mirror! I wish i had seen your tutorial before buying a mirror to "match" my ol' faithful ive had for years. Superb tutorial. I love it a lot!
ReplyDeleteWow! That is a really great idea and it came out so beautifully. I never would have thought of it!! Great step-by-step tute too!
ReplyDeleteawesome, I made sunburst mirror too with bbq sticks but this one looks fab..and divine!
ReplyDeleteLove your website,
xx
Noor
This looks amazing! You're so creative, I find that your projects are always really original. Now I'm going to pin this in case I want to be unoriginal and copy your idea :)
ReplyDeleteSteph
Lovely! VEry creative idea.
ReplyDeleteKathy
now that is neat!
ReplyDeleteThis was beautifully done! I love that you used easily found objects at the hardware store. I, too, feel guilty about taking more than a handful of stir sticks from Home Depot. Wish I had that woman's guts! ~M.
ReplyDeletehttp://redesignedbym.wordpress.com/
This is a crazy-creative project, and the result looks amazing. This definitely looks like something that would retail for $$$ at a fancy furniture market.
ReplyDeleteLove this idea! Very crafty and creative! It's so beachy and textural. Awesome job and thanks for sharing!
ReplyDeleteWhat a cool idea! I love the look of it, thanks for sharing!
ReplyDelete