Last time I showed you my huge mess that was created by loving too many accessories :) And then the solution for getting them out a tangled jumbled mess. I used a few different projects to help display my jewelry which I must say, is far better than throwing them into that little plate or onto a lamp shade never to be seen again :)
First things first these knobs on these shelves are beyond perfect! They work great to hold my necklaces and scarves....I've even thrown a purse or two on them and they hold them perfectly :) You can see the tutorial on making these here.
Next was a way to display my all my other jewelry so I could actually find matching pairs of earrings and see what I actually own :)
First was for my earrings. I have a ton of earrings. Truthfully, I guess I didn't realize how many I actually had until I started trying to find places to put them :) A lot must fit on a plate. lol
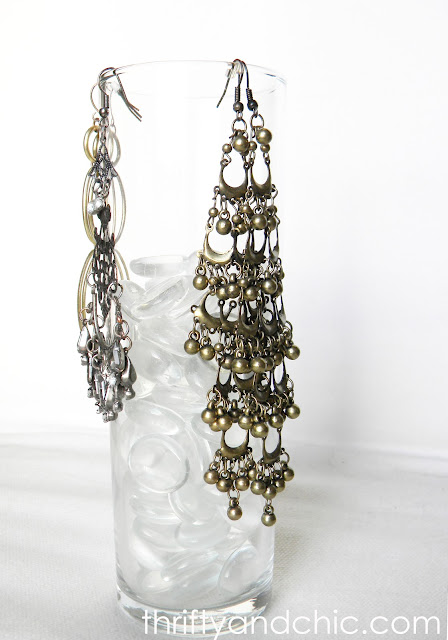
This way was super easy. I just grabbed an old vase I had lying around and threw some earrings on the rim.
This was another take on it. In order to weigh down the tall vase, I put some glass gems in it. Super simple :)
Next was another way to display the earrings. I got this idea when I brought some molding out to see if I should line the shelves with it. It looked ridiculous, then I figured, hey, that's the perfect width and height to hang some earrings on :)
All you do is cut some molding to size. Cut a scrap piece of wood at a small angle, so when attached to the molding, the molding sits back a little bit, then use some wood glue to secure them. Tada! Easy peasy.
Next was using an old frame that I had on my dresser (which my husband broke the glass to, although I think he still blames it on the dog :) ) and turning into another display.
Take some wire mesh and cut it to the size that the backing of the frame is. Attach the wire to the inside of the frame with some hot glue. Cut the fabric to the same size and attach to the front of the back cardboard dealy. Put the two together and voila! Make sure you have the mesh bump out a bit from the frame so you have more room for the earring backs when they are hanging..
Now I have a lot of bracelets and cuffs, and they were pretty much all over the place. So I needed a place to coral them. A bit odd? Yes. Does it work? You better believe it :)
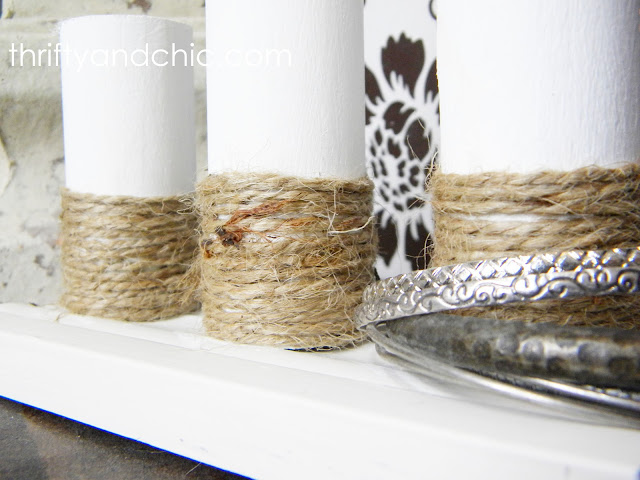
Okay. First was to get a wooden dowel and cut it to three different lengths (just to add interest and cuz I'm weird like that). Next was to get some molding and cut a little bit bigger than the length of the three dowels are when lined up. Measure where you want the dowels to sit on the molding and mark. Then drill a hole. Also drill a hole in the bottom of the dowels. Then screw in the dowels to the molding and paint!
I added a little jute to the bottom so it didn't looks so bland when my bracelets aren't on them :)
Now I had to come up with a place for my rings. I use the black ceramic hand that's currently on the shelf all the time, but it gets weighted down and falls over if there are too many rings on it. So I need a solution to coral the leftover rings. I could have just used a dish, but I was bored :)
I made this baby out some modeling clay. It was really simple. I just made a ball out of some clay, then rolled it out with a rolling pin. Made a smaller ball, placed it in the middle of the rolled out piece, started rolling that out and magically the first rolled piece started shaping up into a bowl. Go figure? Next I took another piece of clay, rolled it in between my hands to get an elongated piece, then shaped it a bit with a curve, pressed it into the bowl. I then shaped the bowl a little with some curved edges. Put the clay in the oven for an hour following the package directions.
I wasn't sure if I liked having just a plain silver dish, so I added some white to the bottom and little swirls in the dish itself. It's a little small, had I known this project would actually work, I would have made it bigger. lol. But now that I know, I see a bigger one in my future :)
And there you have it! A few simple ways to manage your jewelry clutter :)
And just to put a little bird in your ear, I'm guest posting over at the House of Hepworths on Friday! Be sure to stop by and say hello!!!
Subscribe to:
Post Comments (Atom)


wow! i love this, it looks great! found you through Hook up with HOH
ReplyDeleteAnel @ whimsycandidsphotography.com
Wow..this is great..
ReplyDeleteI LOVE IT
Thank you for all the good inspiration
Lill from Norway:)
These are all such beautiful ways to display jewelry (on your gorgeous shelves!) but my favourite has to be the molding! Even if I don't wear a lot of dangly earrings, I will definitely keep this in mind for photographing jewelry that I create.
ReplyDeleteLove your earrings with the drop down beads/stones, do you make your jewelry or is it purchased? It all looks so lovely, like your own personal boutique :)
ReplyDeleteSo creative, I love it! My favorite are the earrings on the white vase, they're so photogenic there! I'd be thrilled if you would link this up at my current link party so everyone can see these! http://practicallyfunctional.net/2012/06/the-fun-in-functional-link-party-3/
ReplyDeleteWow! You're so creative!
ReplyDeleteCan I just borrow some of your talents for a day. :P
This is my first time here and I'm in aw!
New subscriber, for sure.
- Melanie
www.mailboxjourney.com
Really great ideas for jewelry storage and a very nice looking display! I have a cute little white vase just like that too. ;) The ring holder is a pretty cool little handmade piece too.
ReplyDelete